Scrumptious Cornbake

Posted by Muriel Hedgcock

This scrumptious cornbake makes an ideal side dish for a summer barbeque. It is so tasty that you will not be able to resist a second helping. In fact I could not even take a photo of the finished bake once it came out of the oven because it was so quickly tucked into. :)

Ingredients: serves 12-16

1 kg frozen sweetcorn
8-10 rashers bacon
2 beaten eggs
200 ml milk
2 or 3 Tbs Flour
2 Packets crushed biscuits :
Ritz, Salticrax, or savoury crackers
Salt and Pepper ( Herbamare)
Garlic pepper ( optional)
25g Butter
50g grated cheese (optional)


Put the sweetcorn in a pot, add salt and about 100ml water.
Simmer for 10 min.

Add 2-3 Tbs Flour, 25g Butter, grated cheese &
100ml milk to the sweetcorn in the pot.
Stir and bring to the boil until it thickens.

Blend slightly using a hand blender

Place the bacon on a large baking tray and grill for 5-10 min until cooked.

Use a knife or kitchen scissors to cut bacon into little bits.

Crush biscuits into small pieces and add to mixture.
Keep 6-10 biscuits aside to sprinkle on top of the bake

Grease oven-proof dish.

In a seperate bowl, mix together milk, eggs, and seasoning.
Add to the sweetcorn mixture and place in greased oven-proof dish.
Crush 6-10 salticrax and sprinkle over the corn mixture.
Place blobs of butter on top.

Bake in a 180 C oven for 60 min or until golden brown on top. Serve hot.


As I was making this cornbake for a large number of people, I used a 35 cm x 29cm x 6 cm sized pyrex dish.
You could use a smaller dish which will make the corn bake thicker.

Tip: If creamstyle sweetcorn tins are available in your part of the world, it makes the recipe much easier.

Ingredients serve 8-12

1 tin sweetcorn
2 tins creamstyle sweetcorn
6-8 rashers cooked bacon
1 egg beaten with
half a cup milk
salt and pepper
1 packet crushed salted crackers

Mix all 3 tins of corn together in a bowl.
Add 1 beaten egg and milk so the mixture is moist enough once cooked.
Add cooked bacon bits and crushed biscuits
Mix all ingredients together in a bowl and place in greased pyrex dish.
Crush about 6 salted crackers and sprinkle over the corn mixture.
Place blobs of butter on top.
Bake in a 180 C oven for 45-60min or golden brown on top. Serve hot.


Michele kindly gave me the recipe above. She used to bring this Scrumptious Cornbake to our SA braais for all to enjoy!
What a Treat!

Exquisite Pistachio Shortbread

Posted by Muriel Hedgcock

These buttery shortbread biscuits are deliciously melt in mouth. The roasted pistachio bits and the fine icing dusting on top adds an indulgent dimension to them.

Ingredients makes 20
125 gr soft butter
180gr sifted flour
50 gr Castor sugar
20gr chopped pistachio nuts
icing sugar for dusting


Beat butter and sugar until light and creamyAdd sifted flour, then continue beating .
Add chopped Pistachios and stir into mixture
Take shortbread dough out of bowl
and form into a ballTear off pieces and roll them into
little sausages about 2cm x4cmPut on greased baking tray & flatten.Sift icing sugar on top and put in freezer for 5-10min

Bake in preheated oven for 15-20min at 180 C
Enjoy at teatime, anytime or,

as a complimentary touch with your homemade
Halva & Pistachio ice-cream.

Tip: To make your own Castor sugar, put organic sugar or healthy alternative into a coffee grinder or use hand blender and blend for a minute or two.
For icing sugar blend until even finer.

Ice Cream with Halva, Pistachios & Honey

Posted by Muriel Hedgcock


This homemade Ice cream with Halva, Pistachios and Honey is divine.
It simply tastes heavenly.


Ingredients: Makes 2 Litres
500ml double cream
3 Organic eggs separated
Organic sugar ( or healthy alternative)
3Tbsp Honey ( or more)
Halva ( Pistachios & Honey)


Beat egg whites in a bowl until stiff.


Beat egg yolks with 1 Tbs sugar in separate container.
Beat until light and creamy

Beat cream in a large bowl until stiff.
Fold the beaten egg yolks and egg whites into beaten cream.

Crumble Halva with finger tips and cut the Pistachios into bits


Add Halva crumbs & Pistachios bits into the creamy mixture.
Fold in gently.


Pour half the ice cream mixture into a 2 Litre Ice cream container and drizzle honey on top. Then pour the rest of the mixture into container & drizzle more honey. Swirl gently with knitting needle.

Freeze for at least 6 hours or overnight.


Home made Ice Cream

Posted by Muriel Hedgcock

Making your own homemade Ice Cream is as easy as 1, 2, 3,

Ingredients : makes 2 litres

500 ml double cream
3 Organic eggs separated
3 Tablespoon Sugar (or healthy alternative)
5 drops Vanilla essence or Vanilla Stevia


1. Beat egg white in a bowl and add 1 Tbs sugar. Beat until stiff.
2. Beat Egg yolks in separate bowl with 1 Tbs sugar until creamy and light in color.
3. Beat cream until stiff with 1 Tbs sugar in the largest bowl.

Fold the beaten egg yolk into beaten cream.
Then fold beaten egg whites into mixture.
Pour into a 2 litre ice cream container.

Freeze at least 6 hours or overnight.

Brown Baskets

Posted by Muriel Hedgcock

Making Brown Baskets is a creative way of serving baked potatoes.
Beware, make more than you expect to eat! They are easy to make, fun to eat and very tasty! They end up looking like little hedgehogs and my son loves pulling each individual piece of potato out and eating it like a potato chip.

Brown Baskets

red potatoes (any amount)
brown potatoes can be used
olive oil
Herbal salt ( optional)
kosher salt
thyme
oregano

Cut each potato in a straight line like this:
llll, all the way down leaving just a little potato
and the skin at the bottom to hold it together.
Then turn it to the side and repeat
so the end result is a grid.

Place in a glass pan and put about
a spoonful of olive oil on each potato.
then sprinkle salt, thyme and oregano on them.

Bake in a preheated oven at 425 degrees F (200 C)
for 1 hour or until crispy.


When I saw this photo of Sarah on facebook with the heading
"Preparing our famous 'Brown Baskets' ",
I was most fascinated and asked Sarah how she makes them.
She kindly gave me the recipe.
Thank you Sarah :)
Visit their beautiful new website, Rose Campbell's Cottageworks

Chocolate lacework

Posted by Muriel Hedgcock


Chocolate lacework is easier to make than you would expect. It looks very fancy and adds a special finishing touch to any dessert.

First, melt chocolate using the bain marie method.
I place a ceramic bowl on top of a small pot containing a few inches of water. The bowl should fit snugly so that not too much steam escapes from the sides.Break a slab of dark chocolate into pieces and place into the bowl. Bring the water to boil then switch off the heat.
Leave the chocolate to melt slowly, stirring every few minutes.

While you wait, cut out a large square of baking paper.
Fold in half & cut along the fold carefully to form two triangles.
Choose one triangle, and lay it out so that the longest side is away from you.


Take the left corner and turn it over in an arc and line it up up with the centre point facing you, so forming a cone.
Hold it in place with your thumb and forefinger. (see picture)


Twist the first cone smaller so both points come together and the cone is tight with no hole at the tip.
Then fold the points over twice into the cone so that it does not unravel.

Do the same with the other corner, wrapping it around the outside of the first cone.
Now cut a small hole at the tip of the cone.
Do not cut it too large or the chocolate will come out too thick, but don't cut it too small or the stream will be too thin. Experiment to find just the right size.
Now you have a cone that you can use
to make chocolate lacework.


Spoon melted chocolate
into the cone.

Half fill the cone with chocolate
and fold the large end over a few times.


A gentle pressure on this end should cause the chocolate to flow out of the cone in a steady stream.


Once you feel confident about directing the chocolate,
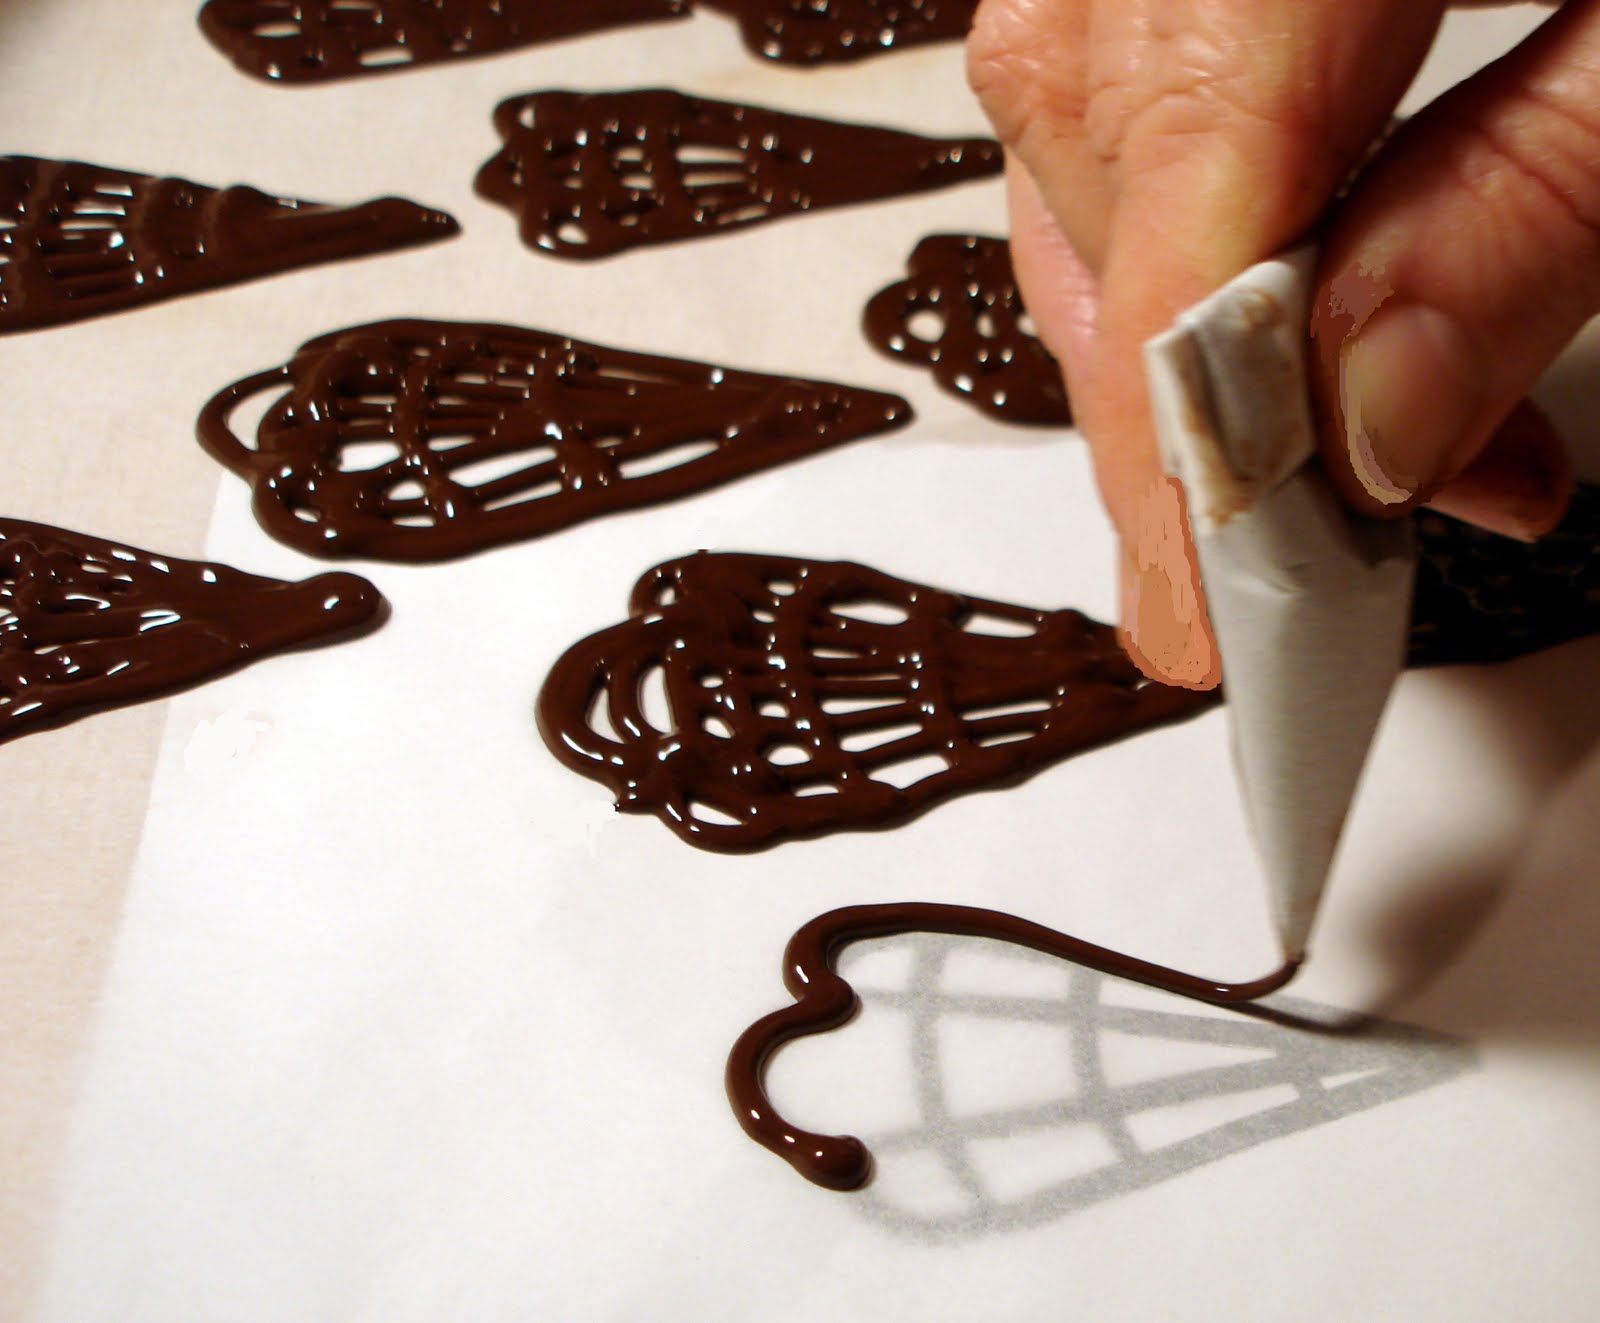
try making shapes on a sheet of baking paper.
I drew a template of lace trimming & went over it
with a marker so I could see through the baking paper.
I placed the template underneath the sheet of baking paper
and then "traced" over the pattern.
Be creative! You could do any shapes from leaves to words.

Pipe chocolate following the outline coming through the baking paper as seen above right.

When you are finished, allow the chocolate lacework to cool at room temperature not fridge.
The refrigerator will give the chocolate a frostbite effect.

Once dry & hard place the chocolate lacework in an airtight container. Leave on baking paper, and peel off when needed. That way the finished chocolate lacework will stay protected.


Use to garnish on any dessert and turn a chocolate mousse or a simple bowl of ice-cream
into an elegant creation.

Creamy Chocolate mousse

Posted by Muriel Hedgcock

Chocolate mousse is an all-time favourite dessert and my husband and my daughter absolutely love it. It is easy to make and can be presented elegantly in individual glasses with a touch of cream and chocolate lacework. A delicious way to finish off a special meal.

Ingredients: makes 6 servings
200 grams Dark chocolate
300ml double cream
3 eggs separated
15ml Castor sugar ( 3 tsp)
20ml Tia Maria or Cognac ( optional)

Water for bain marie to melt chocolate

Pour water into a pot, place bowl on top and break chocolate pieces into the bowl.
Bring water to the boil and turn off heat. The steam will slowly
melt the chocolate. Water should not continue to boil as it will damage the chocolate. Stir once or twice until all chocolate is melted. Set the bowl aside to cool.
In the meantime, beat the 3 egg whites with 5ml sugar until
stiff. Do not over-beat.
Beat the 3 egg yolks with 5ml sugar until light and creamy.
Lastly beat cream until thick, but do not over-beat otherwise the chocolate mousse will not be light but of a firm texture. You will lose a lot of volume and lift if either the cream or the egg whites are over-beaten.
Now for the folding
1.Fold a third of the beaten egg whites into the cooled chocolate.
Work quickly so the chocolate does not get a chance solidify, then add the rest of the egg whites until they are all folded into the chocolate.
2.Now add beaten egg yolks and fold into the chocolate mixture.
The liqueur can be added at this stage. It does enhance the flavour, making it extra special and breaking through the chocolate, but this is optional. It is lovely without it as well.
3.Lastly mix in the beaten cream (keeping a little aside for garnish) until completely folded into the chocolate mousse mixture.


Spoon chocolate mousse into individual glasses and refrigerate for 2 hours before serving.


Garnish with a little cream as it makes a lovely contrast on the dark chocolate. Sprinkle grated chocolate on top. If you get a chance to make your own chocolate lacework it adds a lovely finishing touch.

Tip : You will lose a lot of volume and lift if either the cream or the egg whites are over-beaten.

Bain marie is a French definition for a large pan containing hot water in which a smaller pan is set. It is ideal for melting chocolate. I don't have a proper bain marie set and simply used a small pot with a ceramic bowl snugly placed on top.

© 2010 Creative Cooking with Muriel - All rights reserved
Content and images are strictly the property of the contributors and may not be used without written consent.